Monday, February 10, 2014

DIY Monday: Rustic Coffee Table Plans Included!


Hello all, 
Today I wanted to share one of the projects I FINALLY finished over the weekend. Using a slightly modified version of the plans found on the site, More Like Home I built this coffee table... Yes that's right. I BUILT it. From scratch. All by myself. I'm super proud of myself, since this is the first thing I've ever built on my own. Oh, did I mention that I'm also 9 months pregnant as of this Wednesday? Oh yeah, well that too. Just one more reason why I'm very proud of myself as I'm writing this post. 

For those of you who have thought about trying one of these plans or Ana White's plans but have always been skeptical about how easy or time consuming it is to complete one, here's some advice. Just do it! It was so easy as long as you follow the instructions!! I can't say that enough! Read ALL of the instructions before you start and refer to them constantly while building the project. This is something that you could make yourself on a long weekend and it will add a great rustic charm to your living room!
Below are some pictures that I took along the way:
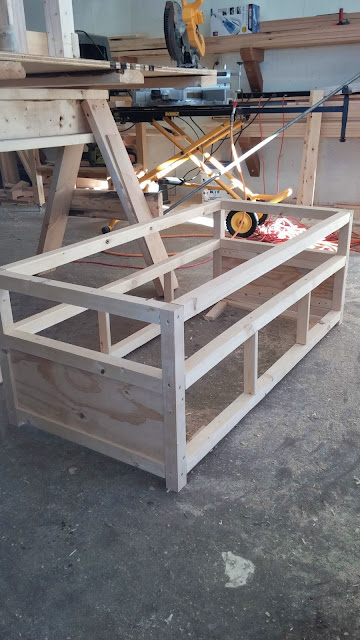
This is a picture of the frame. The frame itself took me about 1 day to complete. I messed up a few times actually because I didn't follow my own advice and read the instructions all of the way through..

If I were smart enough to follow my own advice I could have easily gotten to this stage in one day. It's basically done. The drawers took about an hour to put together and were soo simple it's not even funny. I'm currently trying to think of other ways to incorporate this drawers into my current furniture or other areas of my house because they were just so easy and cheap to build (When I say cheap, I mean about $2.00 a drawer INCLUDING hardware).


And here is the finished project! 

After sanding down the entire table to a nice smooth finish, I used Jacobean Stain which you can buy here. Jacobean is my absolute favorite stain to use. I love how it's a darker stain, but not so dark that you don't get to see the characteristics of the wood. 
I found an awesome deal on knobs for the drawers. Only .99 cents each! You can get them here.
I also always use polyacrylic to finish of my projects. I used to use polyurethane until I found out that over time it can turn and off yellow colour.. not the look I want to go for after a few years of use. After I let the stain completely dry (only about 4 hours) I applied 3 coats of polyacrylic to the entire table. Again, here's a link to Minwax Polyacrylic that I use on ALL of my projects.

Oh right, here is a link to the plans that I used to build this table. Coffee Table Plans
These awesome plans from More Like Home are super easy to follow. They include all of the measurements and cuts you need to make as well as a detailed shopping list and what tools you will need to complete this project. She did a great job putting together the plans, no wonder this is one of the most popular DIY pinterest pins. Congrats More Like Home!

After seeing how easy this coffee table was to build I'm much more confident in my building capabilities. I'm looking forward to sharing more of my successful pinterest DIY's with you. Hopefully this will inspire others to start a wood building project this weekend! Let me know what you think and what you build!
Enjoy!

Friday, February 7, 2014

Pregnancy Outfit & Baby Shower Gift Haul!


I wanted to do one more pregnancy outfit post this week. Here is what I wore to my last Doctors appointment. Just basic maternity jeans, a pink maternity blouse and a green army jacket. Just super simple and most importantly comfortable!
The jeans are from Thyme maternity, the military jacket is from Walmart, and the blouse is also from Thyme.
I also wanted to share what I received as gifts for my baby shower!
My wonderful grandmothers both came through and bought 2 of the big items that I asked for. 
One was the Graco Pack N' Play in the Roundabout pattern/colour scheme. 

The second was a Baby Trend Travel System in Envy.

 I was soo happy to have both. To me the travel system was a must, since I wanted to be able to travel with the baby as easily as possible. This will make trips to the park or grocery store sooo much easier since the car seat just pops from the car right into the stroller. YAY! This way if she's sleeping it won't wake her and I won't have to stand outside in -30  trying to get her from the car into the stroller in the winter.
Below are some other pictures of what I got as gifts. A ton of outfits, some sleepers an infant bathtub shaped like a whale, some hooded bath towels, and some essentials such as Lansinoh nipple creamSudocrem, and some Live Clean Baby bath supplies. Live Clean is my favorite brand especially for little ones. The products are all very gentle on sensitive skin and do not include as many harsh chemicals and other body washes and lotions. I can't yet recommend Sudocrem or Lansinoh cream since I haven't actually tried them yet. I'll have to wait and see! 


The whale bathtub I was talking about!

I'm so thankful for having a family that is so supportive of Fraser and I! Next week I'll hopefully be sending out thank you cards to everyone who attended. I've found a cute little poem and layout that I'll be showing you in a post next week. 
I still need a few things that I'll be surfing kijiji and sales for. I'm looking to get a breast pump, a bottle warmer, and a few good nursing bras. But other than that we are ready to bring baby home!


Wednesday, February 5, 2014

Gluten Free Mediterranean Chicken Recipe


Today I wanted to share my recipe for Mediterranean Chicken. A great plus, it's gluten free! This is one of my favorite healthy recipes to make on a weeknight because its sooo simple and quick to make. Above is a picture of the finished product. I know it kind of looks like slop.. but trust me, it's delicious!!

Ingredients:
4 chicken breasts
1 can of Hunts gluten free diced tomatoes
half an onion, sliced
1/4 cup of Sun-Dried and Tomato & Oregano Dressing
2 tsp. minced garlic
1 tsp. dried oregano leaves
1/4 cup of green olives ( I leave these out since I HATE olives with a passion)
2 cups of brown rice

Directions:
1) Begin to cook the chicken and onions in a large non-stick skillet on medium heat for about 5 minutes or until the chicken is browned on both sides. Begin to cook your rice.
2) Add tomatoes, dressing, garlic and oregano and stir gently until mixed. Cook the mixture for another 5-6 minutes. Add olives. 
3) Spoon rice onto a plate and top with chicken and sauce. Fraser and I both like to add some parmesan cheese on top as well.

And that's it. 3 easy steps and 15 minutes to a great, healthy dinner. 
Enjoy!


Monday, February 3, 2014

34 weeks Pregnancy Outfit

Here's just a quick picture of what I wore recently while going out to grab some groceries. 

It's just a super simple outfit that I like to wear when running errands. It's nice and warm with the vest and the scarf so it's nice when it's too warm for a winter coat but not warm enough to get away with a spring jacket. I always wear my lovely fossil watch that I got for Christmas a few years ago with this outfit. You can buy the exact same watch here.

And also a quick update on my 34 weeks of pregnancy!
As you can see from the picture above, I've gotten HUGE! Some days its like I don't remember I'm pregnant until I catch a glimpse of myself in the mirror and get surprised lol! I still don't have too many stretch marks. I had quick a few on my boobs but as soon as I started using Palmers Cocoa Butter they vanished! I'm very impressed with the product, I'm even trying to use it on old stretch marks to see if it will magically make those vanish as well. Here's hoping!
My baby shower was also this week! I'm so thankful for everyone that came out to support Fraser and I. We are so excited for her to arrive and it was great to celebrate with family and friends!
I've started to pack my hospital bag this week, so hopefully I'll remember to do a post on that sometime this week. I also have a breastfeeding course this Wednesday evening, so hopefully that goes well.
I'll keep you posted!

Wednesday, January 29, 2014

Recipe Tuesday: Hashbrown Casserole

Welcome to Recipe Tuesday... being written on a Wednesday.. oops!
Today I wanted to share my recipe for hashbrown casserole. This recipe is a tried and true favorite in my house. You can eat it morning or night, I usually make it every Christmas morning, since it's such an easy crock pot meal and everyone requests it. It's also just a nice meal to make the night before and throw in the crock pot in the morning. It only takes about 15-20 minutes to put together, and you can even make it shorter by 'cheating' and using bacon bits instead of bacon. 

Ingredients: 1 bag of hashbrowns
1 can of mushroom soup
half an onion
250mL of sour cream 
1 pack of bacon
seasoning salt (enough to taste)
Pepper (enough to taste)
shredded cheese

Directions: 
1) Start by cooking the entire pack of bacon until it is crispy. This is the step where you can 'cheat' like I was saying. This step takes the longest and using bacon bits cuts out about 15 minutes prep time. As the bacon is cooking begin cutting your onion. Once the bacon is cooked, rip/cut it into small bit-sized pieces and add it into the crock pot. 
2) Next you are going to want to brown the onions. Once they are browned add them to the crock pot. 
3) Next you'll want to add the hashbrowns, sour cream and the entire can of mushroom soup into the crock pot. Add the seasoning salt and pepper as well.
4) Stir everything until it's well blended. 
5) Cook the casserole on high for 3-4 hours. In my new crock pot I only cook this casserole for about 2.5 hours, but in my moms older crock pot it takes about 4 hours. The cook time will depend on what sort of crock pot you have. Add the shredded cheese on top when it has about half an hour left to cook. It will melt, but it won't stick to the sides of the crock pot.

And that's it! Like I said, it's a super easy recipe that you really just throw into the crock pot and mix together then cook. 

Hope you enjoy it! Trust me, it's SUPER easy!

Monday, January 27, 2014

DIY Monday: Baby Girl Nursery for under $500!


Hello everyone, sorry for the recent in-activity. I came down with a nasty head cold this week, and anyone who has been sick AND pregnant knows that it is no walk in the park. Anyways, today I wanted to show off our baby girl's nursery. I think it turned out soo well and I'm very proud to show it off. Most of the inspiration came from Sarah Richardson. On her show Sarah's House on HGTV she renovated this beautiful nursery as shown below:

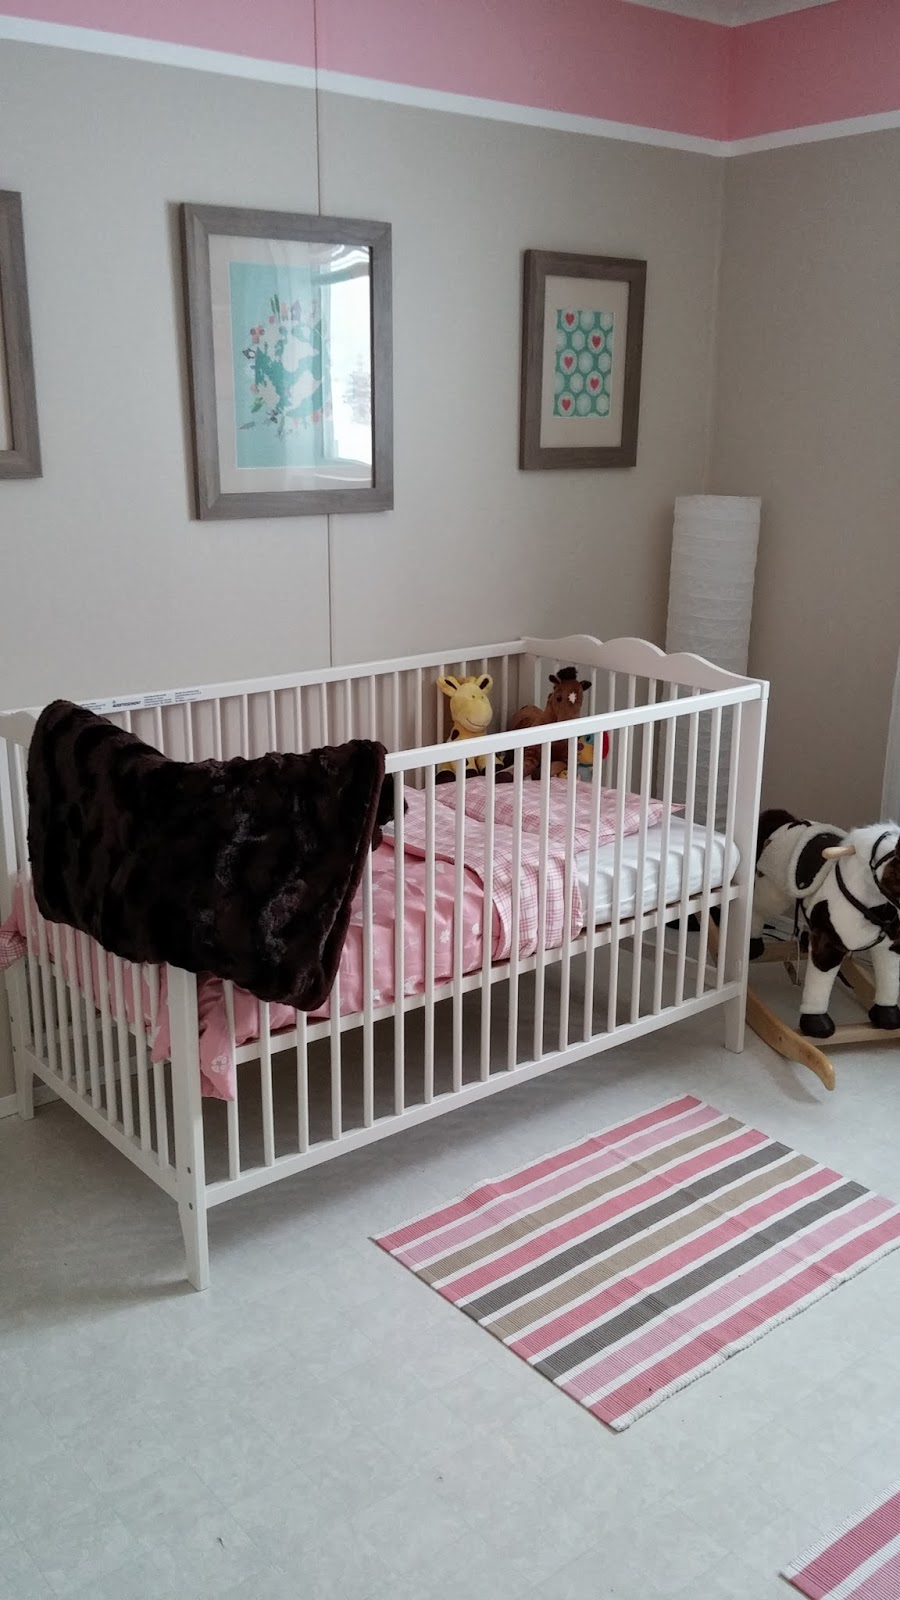
I LOVE the look of this nursery, it's so calm and relaxing and gender neutral. I love how she added some height to the ceiling by adding the trim around the top and placing the painted letters on that trim. I knew I wanted to have our nursery to have the same look since it was such a small space. I also wanted to add some colour, but didn't want to overload such a small room with an entire wall in bright pink or purple. Here is my finished nursery:


When we first moved into the house the previous owners had just painted this room white. Add in the white floors and it was just like an insane asylum. As you can see above, I choose a basic beige for the lower, main portion of the walls. Then I choose a pink for the 'accent' colour on top, a la Sarah Richardson's nursery. I actually didn't put up any trim like she did. I had planned on doing so, so I tapped off the intended area prior to painting. When I was ready to add the trim I pulled the tape off and realized that the white strip that was left behind actually looked fine just on it's own. I also figured that if I didn't have to spend money on trim then why should I?
Next, came a trip to Ikea, YAY! I managed to purchase ALL of the furniture for this room for under $400 dollars. That's not too shabby if you ask me! A total cost break down of the room goes like this:
Crib and matress: $100.00 on kijiji (originally from Ikea)
Bookshelf: $75.00 at Ikea
Changing Table: On Sale at Ikea for $40.00!
The other $175.00 dollars was spent on items like the teal and white curtains, the pink accent rugs on the floor, the picture frames, bedding etc.

Including painting supplies I managed to re-do this nursery for under $500! I think that is a GREAT deal. However, I don't think I would have been able to do it if I didn't use resources such as kijiji or craigslist. Make use of these great resources! One persons junk is another persons treasure!
Thanks for reading, and hopefully I've given some of you some ideas for your own nursery(s).

Monday, January 20, 2014

DIY Monday: Painted counter tops for under $50 dollars!


Hello everyone, today I wanted to share with you a DIY project that I took on in our house. All for under $50!! When I first told my mom that I wanted to paint my counter tops in my bathroom to look similar to granite, she looked at me like I had 3 heads. I know that it sounds crazy, but I think the counter tops turned out beautifully! Here is a picture of the finished project: 

I think it turned out really well! After completing the project I ended up going on a counter top painting DIY spree! I did the counter tops in our master bathroom (which look exactly the same as the pictures shown above) and I also did the kitchen counter tops. You'll notice that they look a little different, and that would be because I actually used 2 different application techniques to find out which one I liked best. The bathroom (pictured above) was painted with a scrunched up grocery bag. The kitchen counter tops were painted with a sea sponge that I managed to find at Michael's Craft Store. Here is a look at the painted kitchen counter tops:

I have to say I think I like the plastic grocery bag application method much better! The sponge almost absorbed the paint too much, and didn't give it a 'granite-y' look like I was going for.
Here's just a quick description of how I managed to paint these counter tops. However unfortunately I lost all of my pictures from this project!! Hopefully my description will be enough.. :

Supplies:
1 can of Oil based primer (base counter top colour) = $20.00 @ Home Depot
Small paint roller (like the one you would use for painting trim) = $ 7.00 @ Home Depot
1 bag of foam paint brushes = $1.00 @ the dollar store
Plastic grocery bag = free!
OR
Sea Sponge = $5.00 @ Michael's Craft Store
Assorted Acrylic paints ( I used 3 different colours) = $1.00 @ the dollar store
1 Can of Clear Satin Polyacrylic = $17.00

Steps:
Step 1: Clear everything off of the counter top that you've chosen to paint. If you have caulking around your sink area, peel it off. I used a razor that I had around the house to peel the caulking off nicely. Plus it was so old that you could just pull most of it off with your fingers. Wash the counter with a TSP mixture just as if it were a wall that you were going to paint. Rinse the TSP mixture off with warm water and a clean cloth. Wipe dry. Apply painters tape around the walls and cabinets if you think it is necessary. 
Step 2: Begin applying the oil based primer that you have chosen to be your base colour. Make sure that it is OIL BASED!!! That's very important. If you go with a water based primer it won't adhere to the counter top as nicely and it won't put up with wear and tear as nicely either. Use your trim roller to apply the primer. Use the foam paint brushes to get right into the corners of the counter. You will most likely have to use 2 coats.
Step 3: Let your 2 coats of primer dry. After the primer has dried you can begin applying the acrylic paints that you have chosen. Start by just doing one colour at a time with whatever application method you have chosen (plastic grocery bag or sea sponge). Try to just apply the colour randomly. At first it will look a little funny, and if you're anything like me, you might start to panic at this point and think that you're mom was right and now you've ruined your counter tops... Just push through these thoughts... It will turn out ok! Let the colour dry before applying the next one.
Step 4: Repeat step 3 as needed. It will depend on how many colours that you have chosen to paint. Be sure to use a new grocery bag for each colour or, rinse and dry the sponge with each colour. Again, try your best to just apply the acrylic colours randomly. After you finish applying all of your colours let it dry overnight. 
Step 5: Once your counters have completely dried you'll now begin to apply your polyacrylic top coat.  I always chose polyacrylic over polyurethane because it won't yellow as it ages like polyurethane does.  I also find that polyacrylic can handle more wear and tear than polyurethane, which is something that you definitely want to keep in mind if you have kids. Make sure you have chosen a clear satin polyacrylic or else it might leave funny streaks. Use your foam brushes for this. I find that the foam brushes just applied the polyacrylic evenly so there weren't any areas that had more polyacrylic than others. I also try to always make my first coat of polyacrylic quite thick. Keep in mind that the polyacrylic WILL dry clear, so don't be alarmed if it looks a little milky when you first apply it. Once you have applied your first coat, let it dry completely before applying your second. If you can, leave it to dry overnight. I applied 4 or 5 coats of polyacrylic and I still haven't found a single chip in any of my painted counter tops!
Step 6: After you've applied your last coat of polyacrylic you can now apply some new caulking around the edges of your counter top and sink area. I had Fraser do this for me because I hate caulking things with a passion!! After you've applied your caulking, that's it! You've finished painting your counter tops!

Let me know what you think about these counter tops or if you have done the same thing in your house. Enjoy and Happy DIY-ing!