Monday, February 10, 2014

DIY Monday: Rustic Coffee Table Plans Included!


Hello all, 
Today I wanted to share one of the projects I FINALLY finished over the weekend. Using a slightly modified version of the plans found on the site, More Like Home I built this coffee table... Yes that's right. I BUILT it. From scratch. All by myself. I'm super proud of myself, since this is the first thing I've ever built on my own. Oh, did I mention that I'm also 9 months pregnant as of this Wednesday? Oh yeah, well that too. Just one more reason why I'm very proud of myself as I'm writing this post. 

For those of you who have thought about trying one of these plans or Ana White's plans but have always been skeptical about how easy or time consuming it is to complete one, here's some advice. Just do it! It was so easy as long as you follow the instructions!! I can't say that enough! Read ALL of the instructions before you start and refer to them constantly while building the project. This is something that you could make yourself on a long weekend and it will add a great rustic charm to your living room!
Below are some pictures that I took along the way:
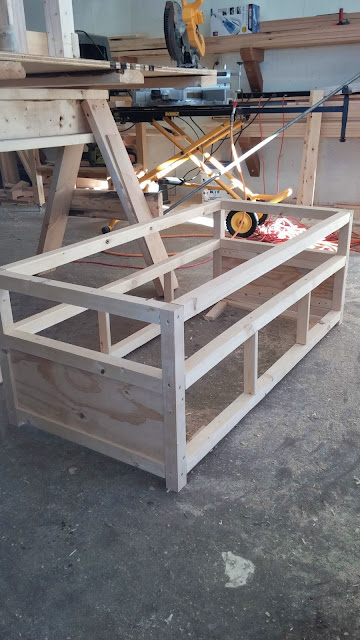
This is a picture of the frame. The frame itself took me about 1 day to complete. I messed up a few times actually because I didn't follow my own advice and read the instructions all of the way through..

If I were smart enough to follow my own advice I could have easily gotten to this stage in one day. It's basically done. The drawers took about an hour to put together and were soo simple it's not even funny. I'm currently trying to think of other ways to incorporate this drawers into my current furniture or other areas of my house because they were just so easy and cheap to build (When I say cheap, I mean about $2.00 a drawer INCLUDING hardware).


And here is the finished project! 

After sanding down the entire table to a nice smooth finish, I used Jacobean Stain which you can buy here. Jacobean is my absolute favorite stain to use. I love how it's a darker stain, but not so dark that you don't get to see the characteristics of the wood. 
I found an awesome deal on knobs for the drawers. Only .99 cents each! You can get them here.
I also always use polyacrylic to finish of my projects. I used to use polyurethane until I found out that over time it can turn and off yellow colour.. not the look I want to go for after a few years of use. After I let the stain completely dry (only about 4 hours) I applied 3 coats of polyacrylic to the entire table. Again, here's a link to Minwax Polyacrylic that I use on ALL of my projects.

Oh right, here is a link to the plans that I used to build this table. Coffee Table Plans
These awesome plans from More Like Home are super easy to follow. They include all of the measurements and cuts you need to make as well as a detailed shopping list and what tools you will need to complete this project. She did a great job putting together the plans, no wonder this is one of the most popular DIY pinterest pins. Congrats More Like Home!

After seeing how easy this coffee table was to build I'm much more confident in my building capabilities. I'm looking forward to sharing more of my successful pinterest DIY's with you. Hopefully this will inspire others to start a wood building project this weekend! Let me know what you think and what you build!
Enjoy!

Friday, February 7, 2014

Pregnancy Outfit & Baby Shower Gift Haul!


I wanted to do one more pregnancy outfit post this week. Here is what I wore to my last Doctors appointment. Just basic maternity jeans, a pink maternity blouse and a green army jacket. Just super simple and most importantly comfortable!
The jeans are from Thyme maternity, the military jacket is from Walmart, and the blouse is also from Thyme.
I also wanted to share what I received as gifts for my baby shower!
My wonderful grandmothers both came through and bought 2 of the big items that I asked for. 
One was the Graco Pack N' Play in the Roundabout pattern/colour scheme. 

The second was a Baby Trend Travel System in Envy.

 I was soo happy to have both. To me the travel system was a must, since I wanted to be able to travel with the baby as easily as possible. This will make trips to the park or grocery store sooo much easier since the car seat just pops from the car right into the stroller. YAY! This way if she's sleeping it won't wake her and I won't have to stand outside in -30  trying to get her from the car into the stroller in the winter.
Below are some other pictures of what I got as gifts. A ton of outfits, some sleepers an infant bathtub shaped like a whale, some hooded bath towels, and some essentials such as Lansinoh nipple creamSudocrem, and some Live Clean Baby bath supplies. Live Clean is my favorite brand especially for little ones. The products are all very gentle on sensitive skin and do not include as many harsh chemicals and other body washes and lotions. I can't yet recommend Sudocrem or Lansinoh cream since I haven't actually tried them yet. I'll have to wait and see! 


The whale bathtub I was talking about!

I'm so thankful for having a family that is so supportive of Fraser and I! Next week I'll hopefully be sending out thank you cards to everyone who attended. I've found a cute little poem and layout that I'll be showing you in a post next week. 
I still need a few things that I'll be surfing kijiji and sales for. I'm looking to get a breast pump, a bottle warmer, and a few good nursing bras. But other than that we are ready to bring baby home!


Wednesday, February 5, 2014

Gluten Free Mediterranean Chicken Recipe


Today I wanted to share my recipe for Mediterranean Chicken. A great plus, it's gluten free! This is one of my favorite healthy recipes to make on a weeknight because its sooo simple and quick to make. Above is a picture of the finished product. I know it kind of looks like slop.. but trust me, it's delicious!!

Ingredients:
4 chicken breasts
1 can of Hunts gluten free diced tomatoes
half an onion, sliced
1/4 cup of Sun-Dried and Tomato & Oregano Dressing
2 tsp. minced garlic
1 tsp. dried oregano leaves
1/4 cup of green olives ( I leave these out since I HATE olives with a passion)
2 cups of brown rice

Directions:
1) Begin to cook the chicken and onions in a large non-stick skillet on medium heat for about 5 minutes or until the chicken is browned on both sides. Begin to cook your rice.
2) Add tomatoes, dressing, garlic and oregano and stir gently until mixed. Cook the mixture for another 5-6 minutes. Add olives. 
3) Spoon rice onto a plate and top with chicken and sauce. Fraser and I both like to add some parmesan cheese on top as well.

And that's it. 3 easy steps and 15 minutes to a great, healthy dinner. 
Enjoy!


Monday, February 3, 2014

34 weeks Pregnancy Outfit

Here's just a quick picture of what I wore recently while going out to grab some groceries. 

It's just a super simple outfit that I like to wear when running errands. It's nice and warm with the vest and the scarf so it's nice when it's too warm for a winter coat but not warm enough to get away with a spring jacket. I always wear my lovely fossil watch that I got for Christmas a few years ago with this outfit. You can buy the exact same watch here.

And also a quick update on my 34 weeks of pregnancy!
As you can see from the picture above, I've gotten HUGE! Some days its like I don't remember I'm pregnant until I catch a glimpse of myself in the mirror and get surprised lol! I still don't have too many stretch marks. I had quick a few on my boobs but as soon as I started using Palmers Cocoa Butter they vanished! I'm very impressed with the product, I'm even trying to use it on old stretch marks to see if it will magically make those vanish as well. Here's hoping!
My baby shower was also this week! I'm so thankful for everyone that came out to support Fraser and I. We are so excited for her to arrive and it was great to celebrate with family and friends!
I've started to pack my hospital bag this week, so hopefully I'll remember to do a post on that sometime this week. I also have a breastfeeding course this Wednesday evening, so hopefully that goes well.
I'll keep you posted!